Threats
Adding, updating, and deleting a threat
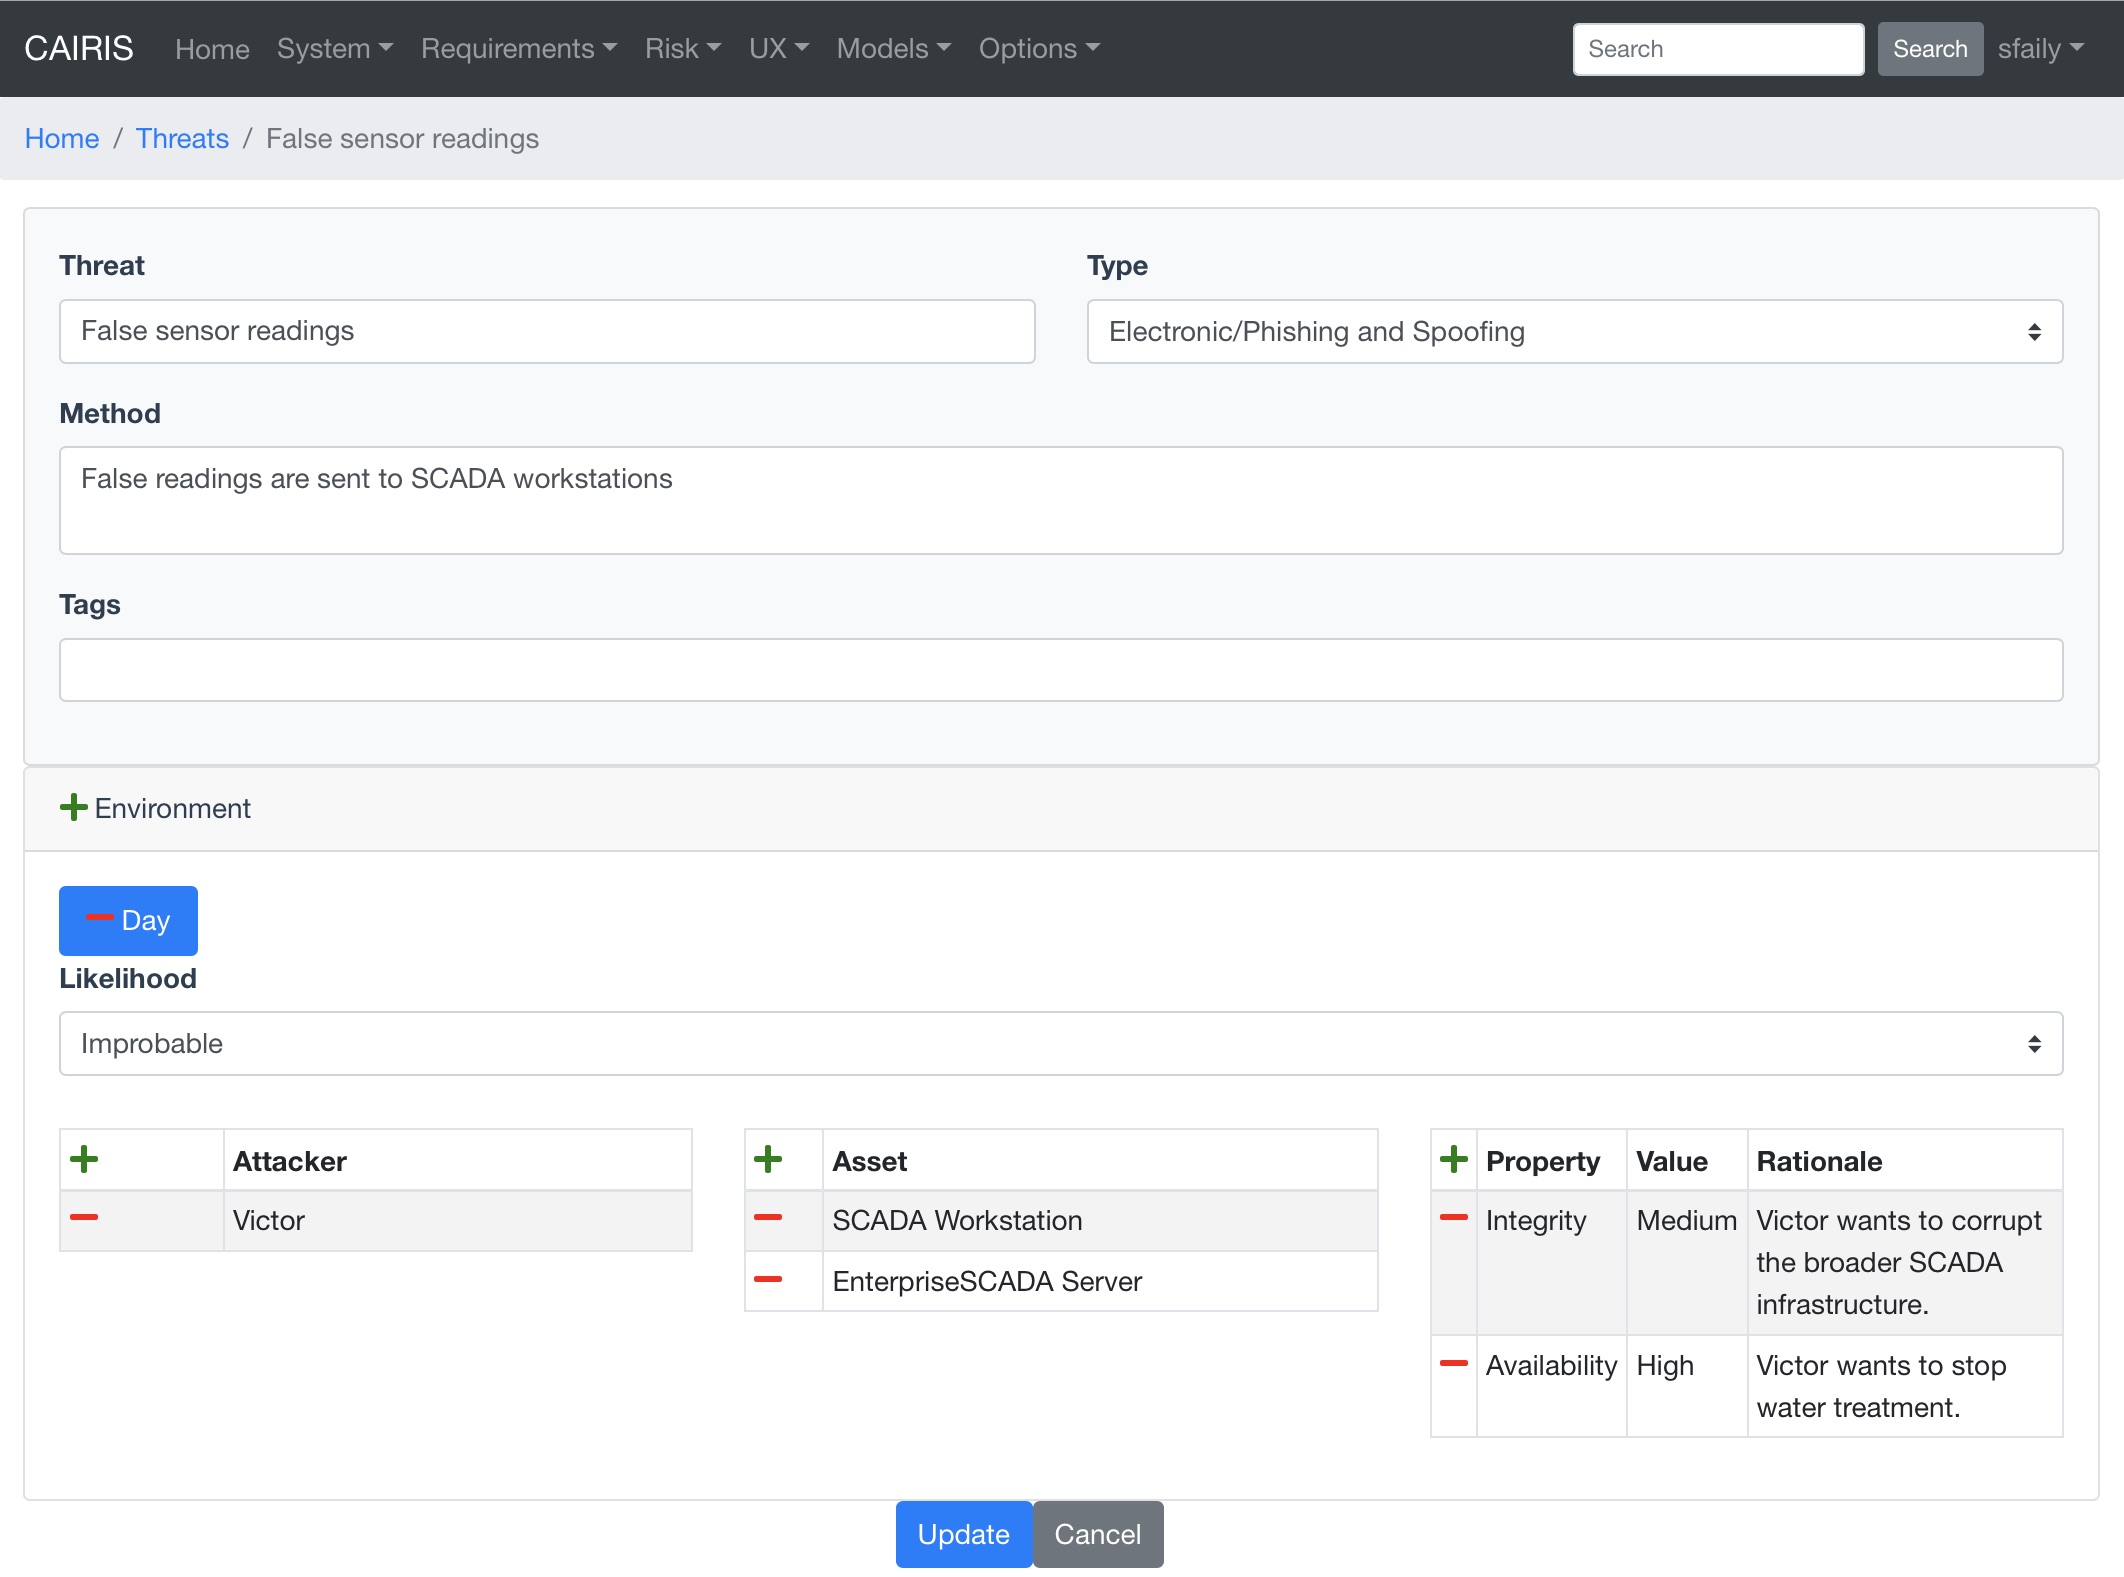
Threats are synonymous with attacks, and can therefore only be defined if an associated attacker has also been defined. Like vulnerabilities, threats are associated with one or more assets. However, threats may also target certain security properties as well, in line with security values that an attacker wishes to exploit.
A threat is also of a certain type. CAIRIS is pre-loaded with a selection of these, but these can be modified, or new threat types created by selecting the Options/Threat Types menu option.
- Select the Risks/Threats menu to open the Threats table, and click on the Add button to open the Threat form.
- Enter the threat name, the method taken by an attacker to release the threat, and select the threat type.
- Click on the Add button in the environment card, and select an environment to situate the threat in. This will add the new environment to the environment list.
- Select the threat’s likelihood for this environment
- Associate attackers with this threat by clicking on the Add button above the Attacker table, and selecting one or more attackers specific to the environment.
- Add threatened assets by clicking on the Add button above the Assets table, and selecting one or more assets specific to the environment.
- Add the security properties to this threat by clicking on the Add button above the properties table, and selecting a security property, value, and rationale.
- Click on the Create button to add the new threat.
- Existing threats can be modified by clicking on the threat in the Threats table, making the necessary changes, and clicking on the Update button.
- To delete a threat, click on the Delete button threat next to the threat to be removed in the Threats table. If any artifacts are dependent on this attacker then a dialog box stating these dependencies are displayed. The user has the option of selecting Yes to remove the threat dependencies and the threat itself, or No to cancel the deletion.
Threat Modelling
CAIRIS supports two different techniques for threat modelling.
Data flows and Data Flow Diagrams
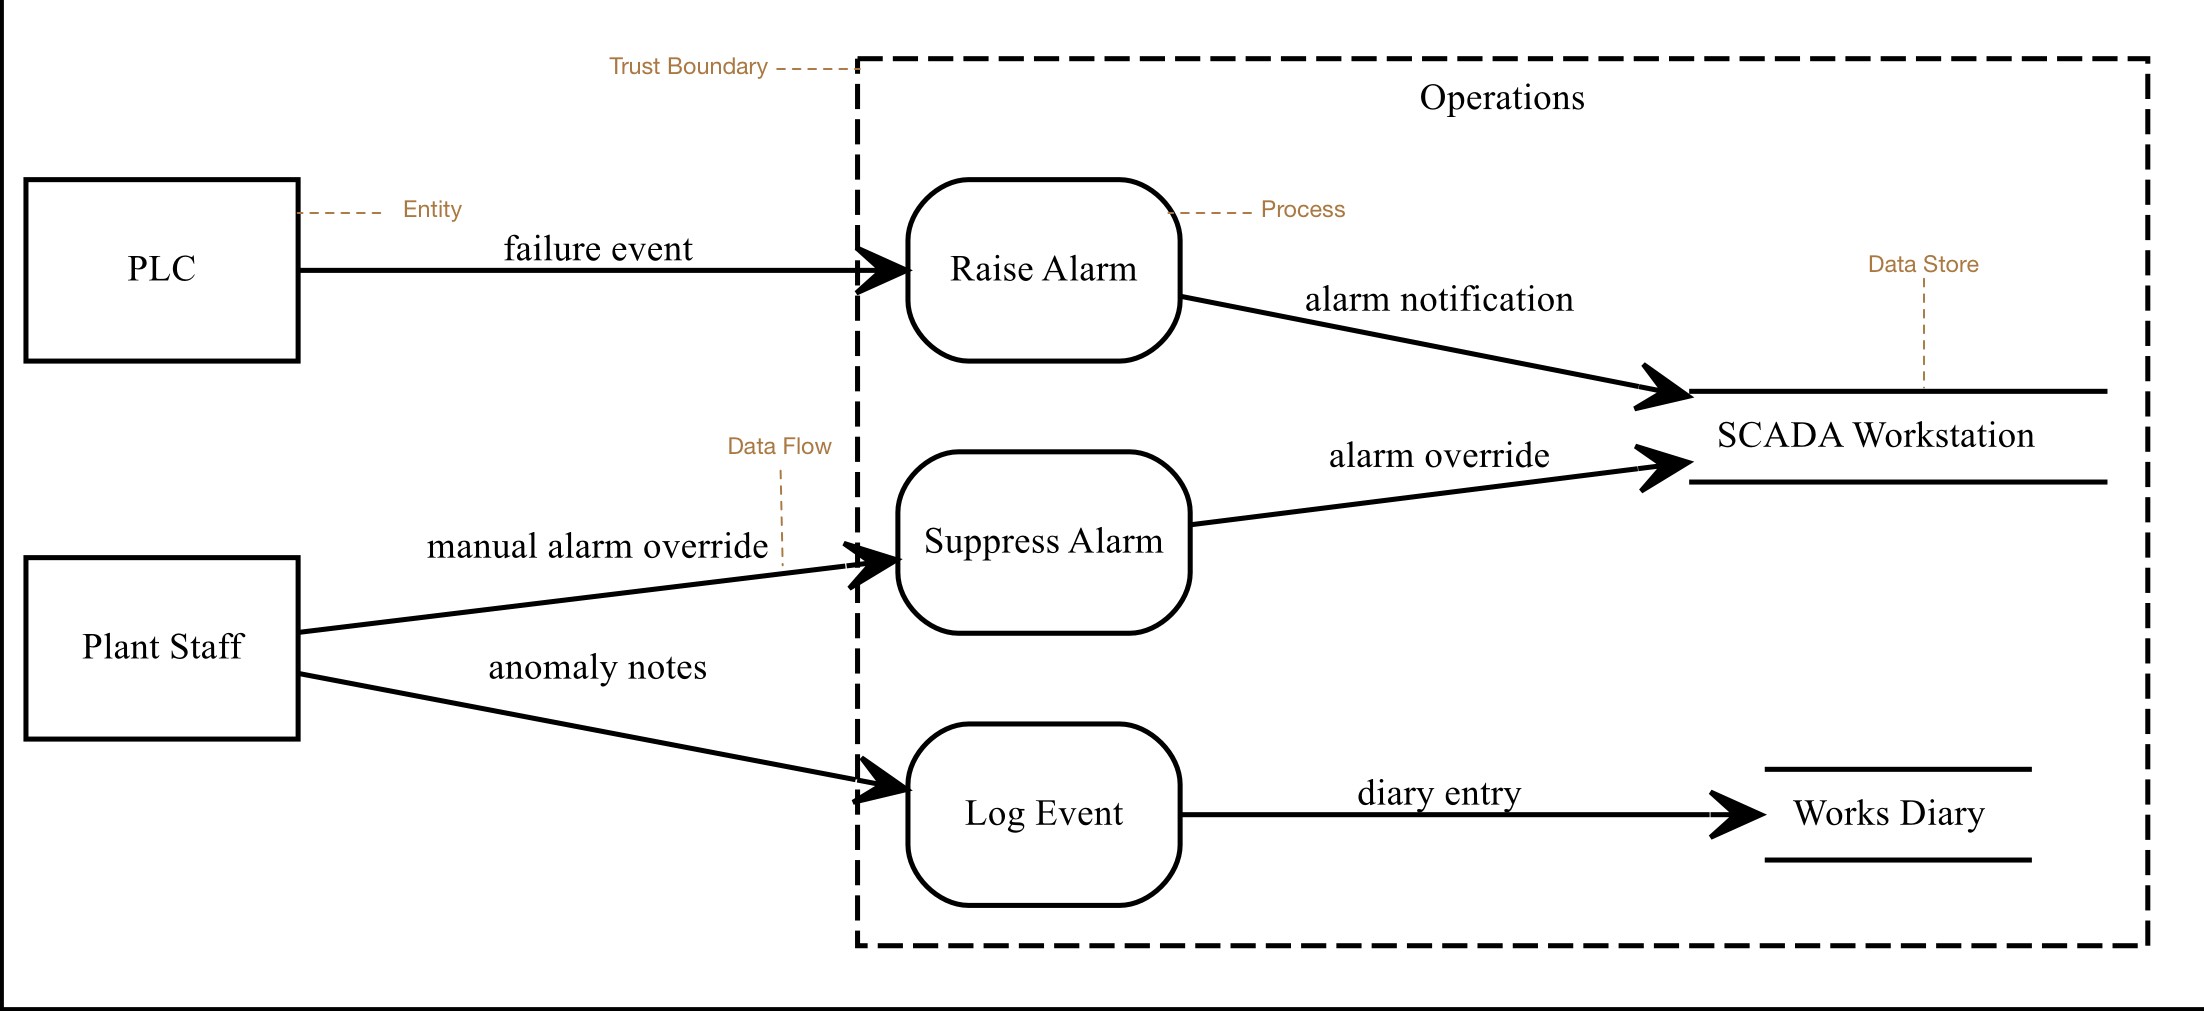
Data flow diagrams (DFDs) are graphical models that model the flow of information (data flows) between external human or system actors external to the system (entities), activities that manipulate data (processes), and persistent data storage (data stores). Together with attack trees. In threat modelling, DFD model elements can be encompassed by trust boundaries; these occur where entities with different privileges interact.
Adding, updating, and deleting entities, processes, and data stores
Entities are synonyms for assets of type Systems, Hardware, or People. Data stores are synonyms for assets of type Information. To add, update, or delete entities and data stores, you need to add, delete or update the synonymous asset.
Procesess are synonyms for use cases. To add, update, or delete processes, you need to add, delete or update the synonymous use cases.
Adding, updating, or deleting data flows
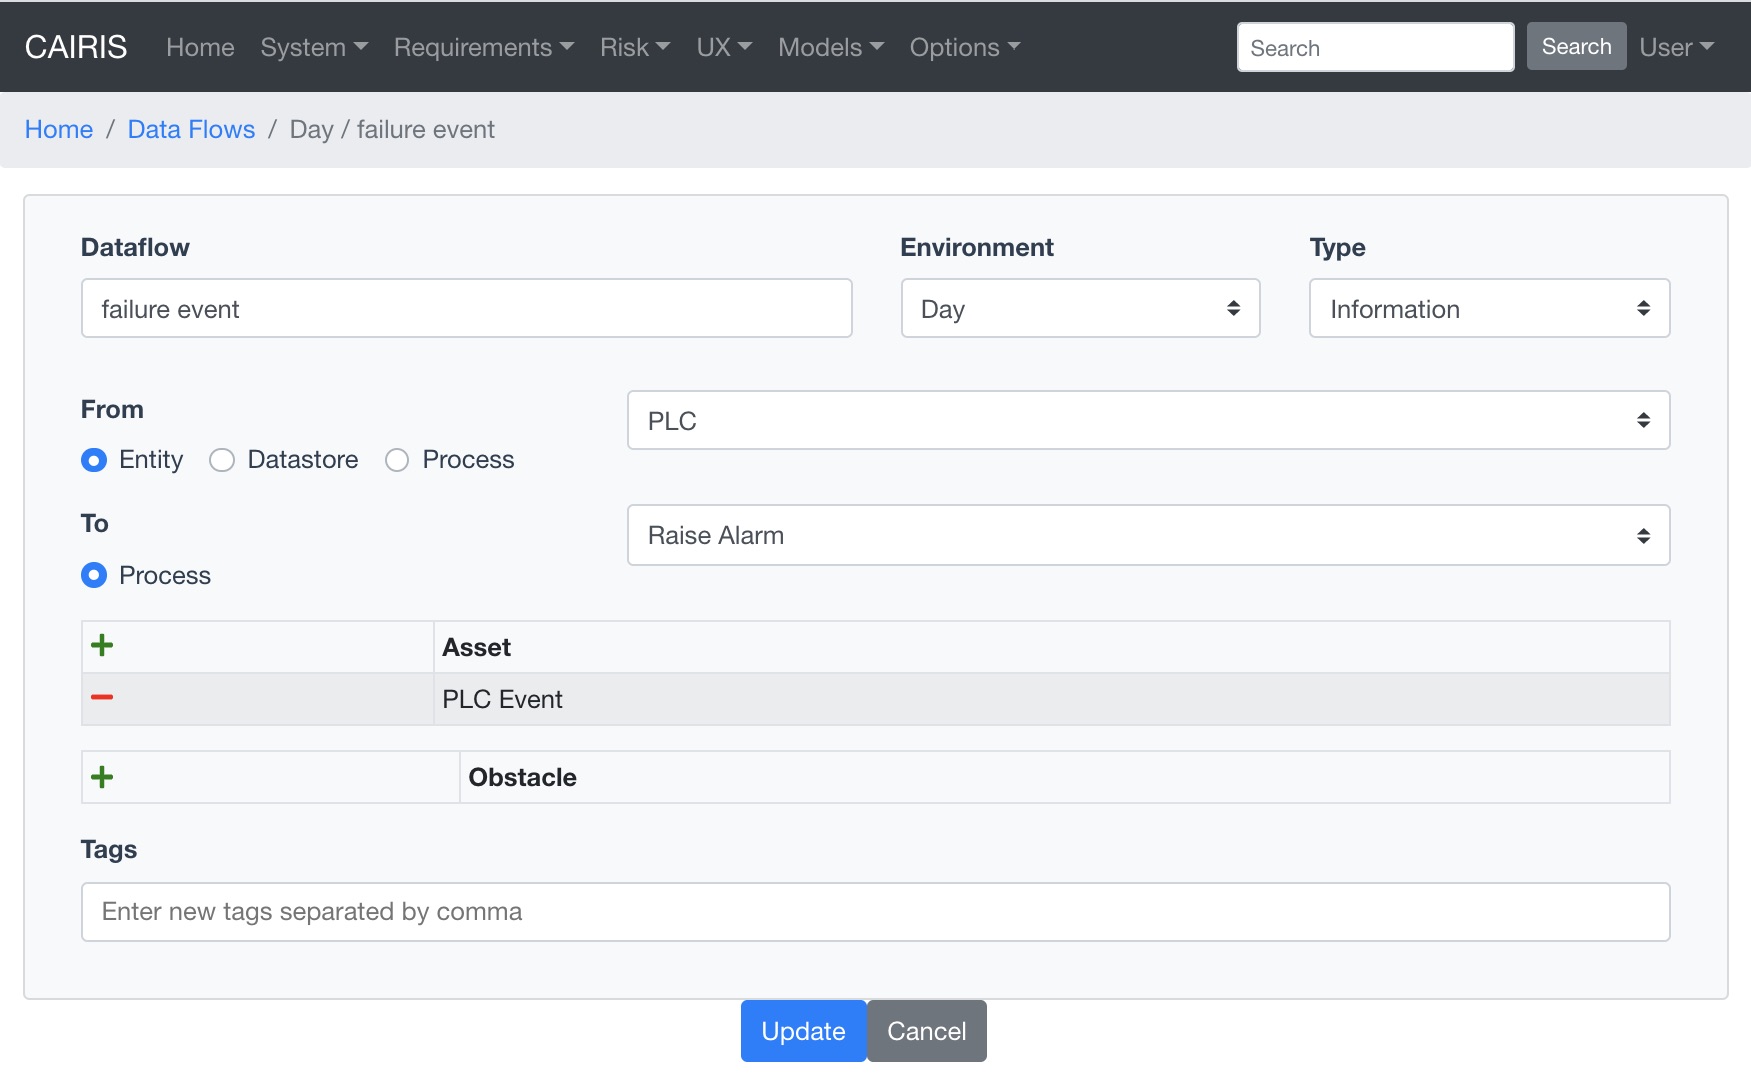
- To add a data flow, select the UX / Data Flows menu to open the Data Flows table. Click on the Add button to open a dialog for adding a new data flow.
- Enter the name for the data flow, select the environment the data flow is specific to, and select the data flow type. You should also select the from and to types associated with the flow. These types are Entities, Data Stores, and Processes, where Entities are information, hardware, or people assets, Data Stores are information assets, and Processes are use cases.
- Click the Add button in the Asset table to choose one or more assets carried by this data flow.
- Should there be any obstructions to the data flow, click the Add button in the Obstacle table to add associated obstacles.
- Click on the Create button to add the data flow to the Data Flows table.
- An existing data flow can be edited by clicking on a data flow in the Data Flow table, updating any aspect of the data flow, and clicking on the Update button.
- Data flows can be deleted by clicking on the Delete button associated with the data flow to be removed in the Data Flows table.
Adding, updating, or deleting trust boundaries
| alt: | Trust Boundary dialog |
|---|
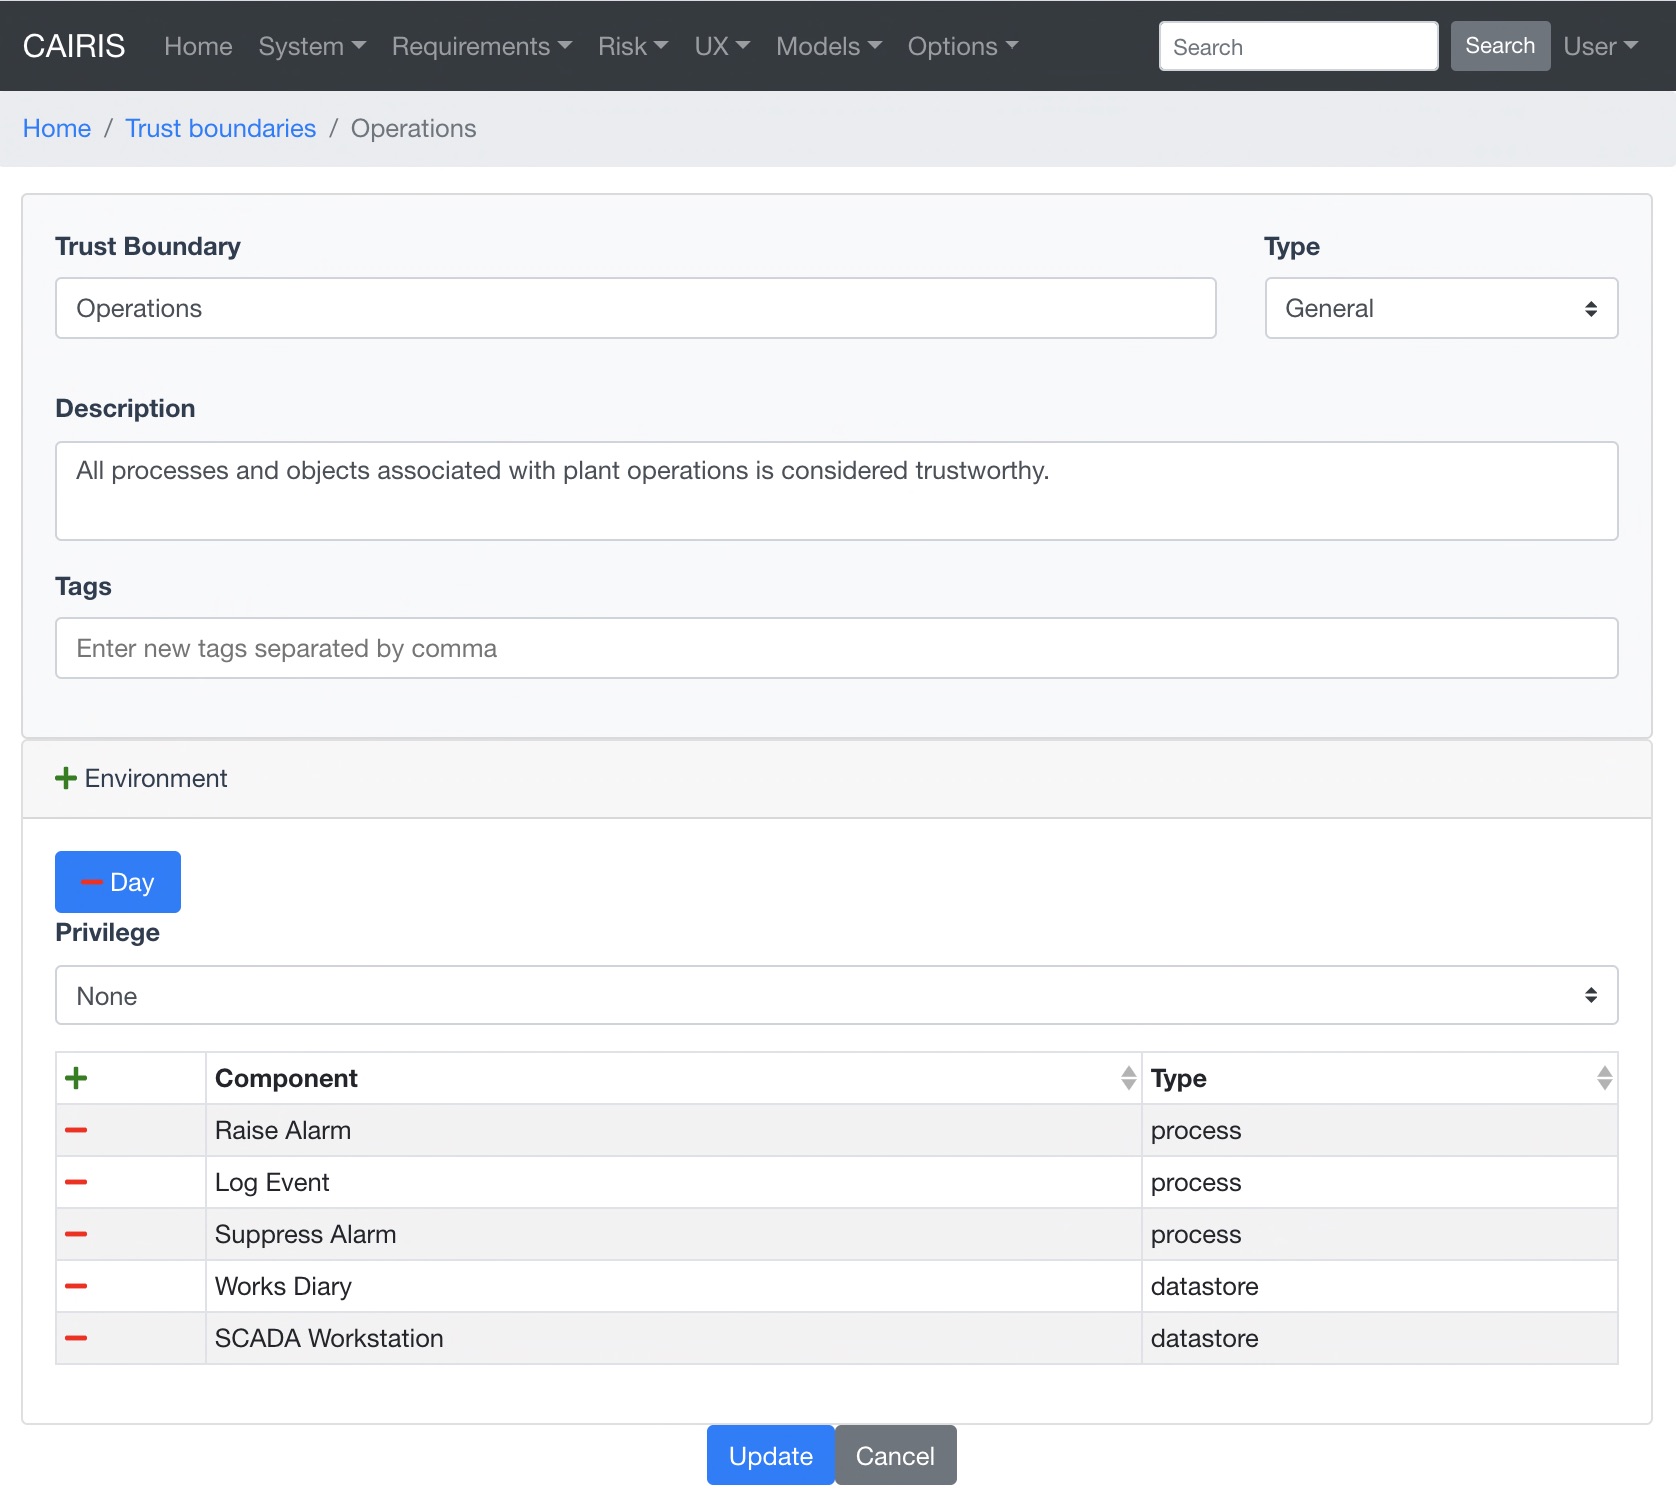
- To add a trust boundary, select the UX / Trust Boundaries menu to open the Trust Boundaries table. Click on the Add button to open a dialog for adding a new trust boundary.
- Enter the name, select the type, and enter a description for the trust boundary.
- Click on the Add button in the environment card, and select an environment to situate the trust boundary in. This will add the new environment to the environment list.
- Click the Add button in the Components table to situate a process or data store within this environment specific trust boundary.
- Select the level of privilege that the components in this trust boundary operate at.
- Click on the Create button to add the trust boundary to the Trust Boundary table.
- An existing trust boundary can be edited by clicking on a trust boundary in the Trust Boundaries table, updating any aspect of the trust boundary, and clicking on the Update button.
- Data flows can be deleted by clicking on the Delete button associated with the trust boundary to be removed in the Trust Boundaries table.
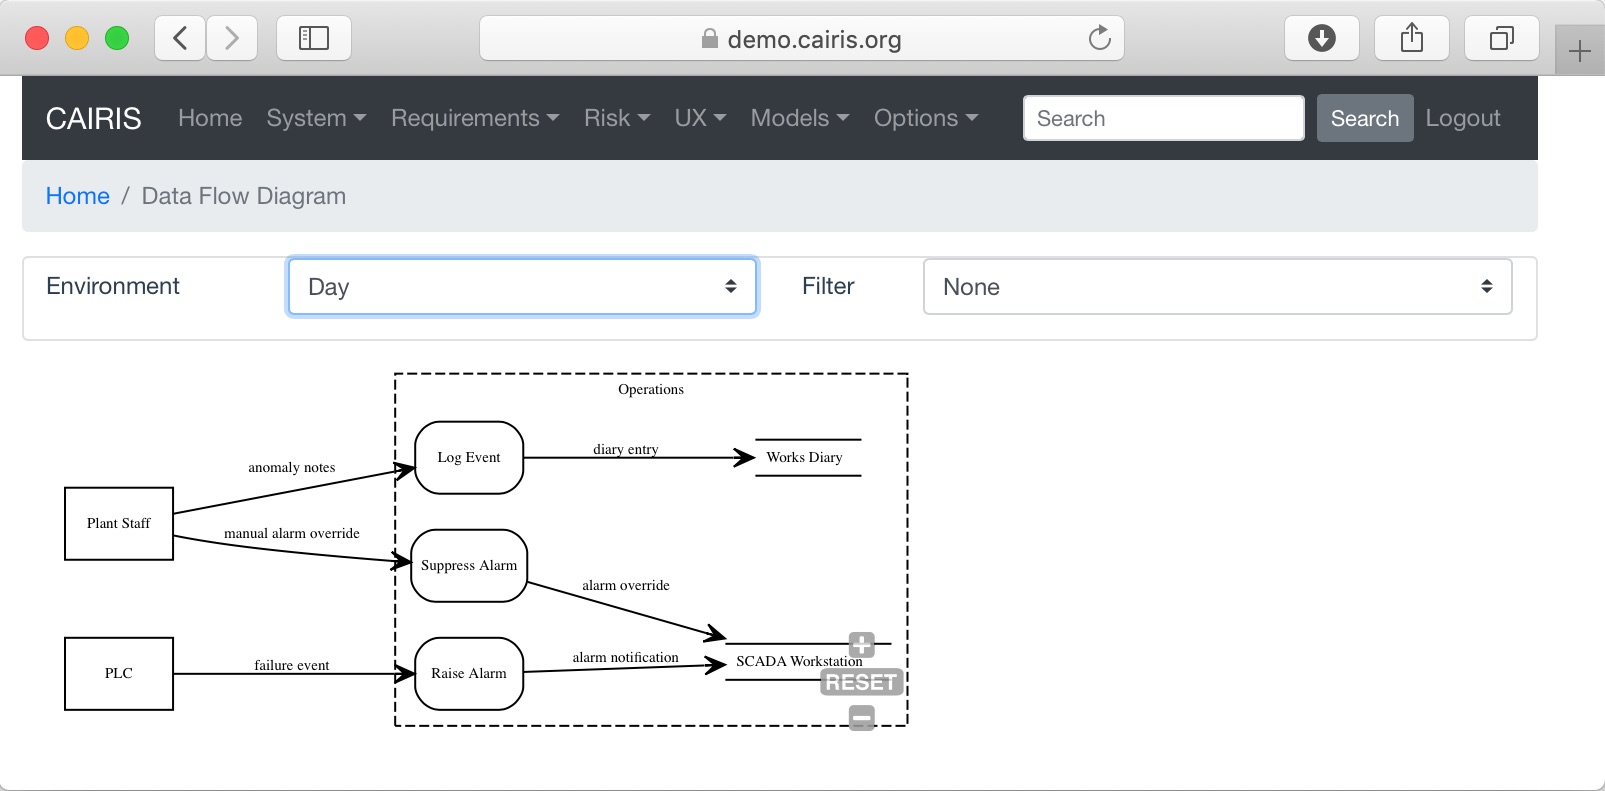
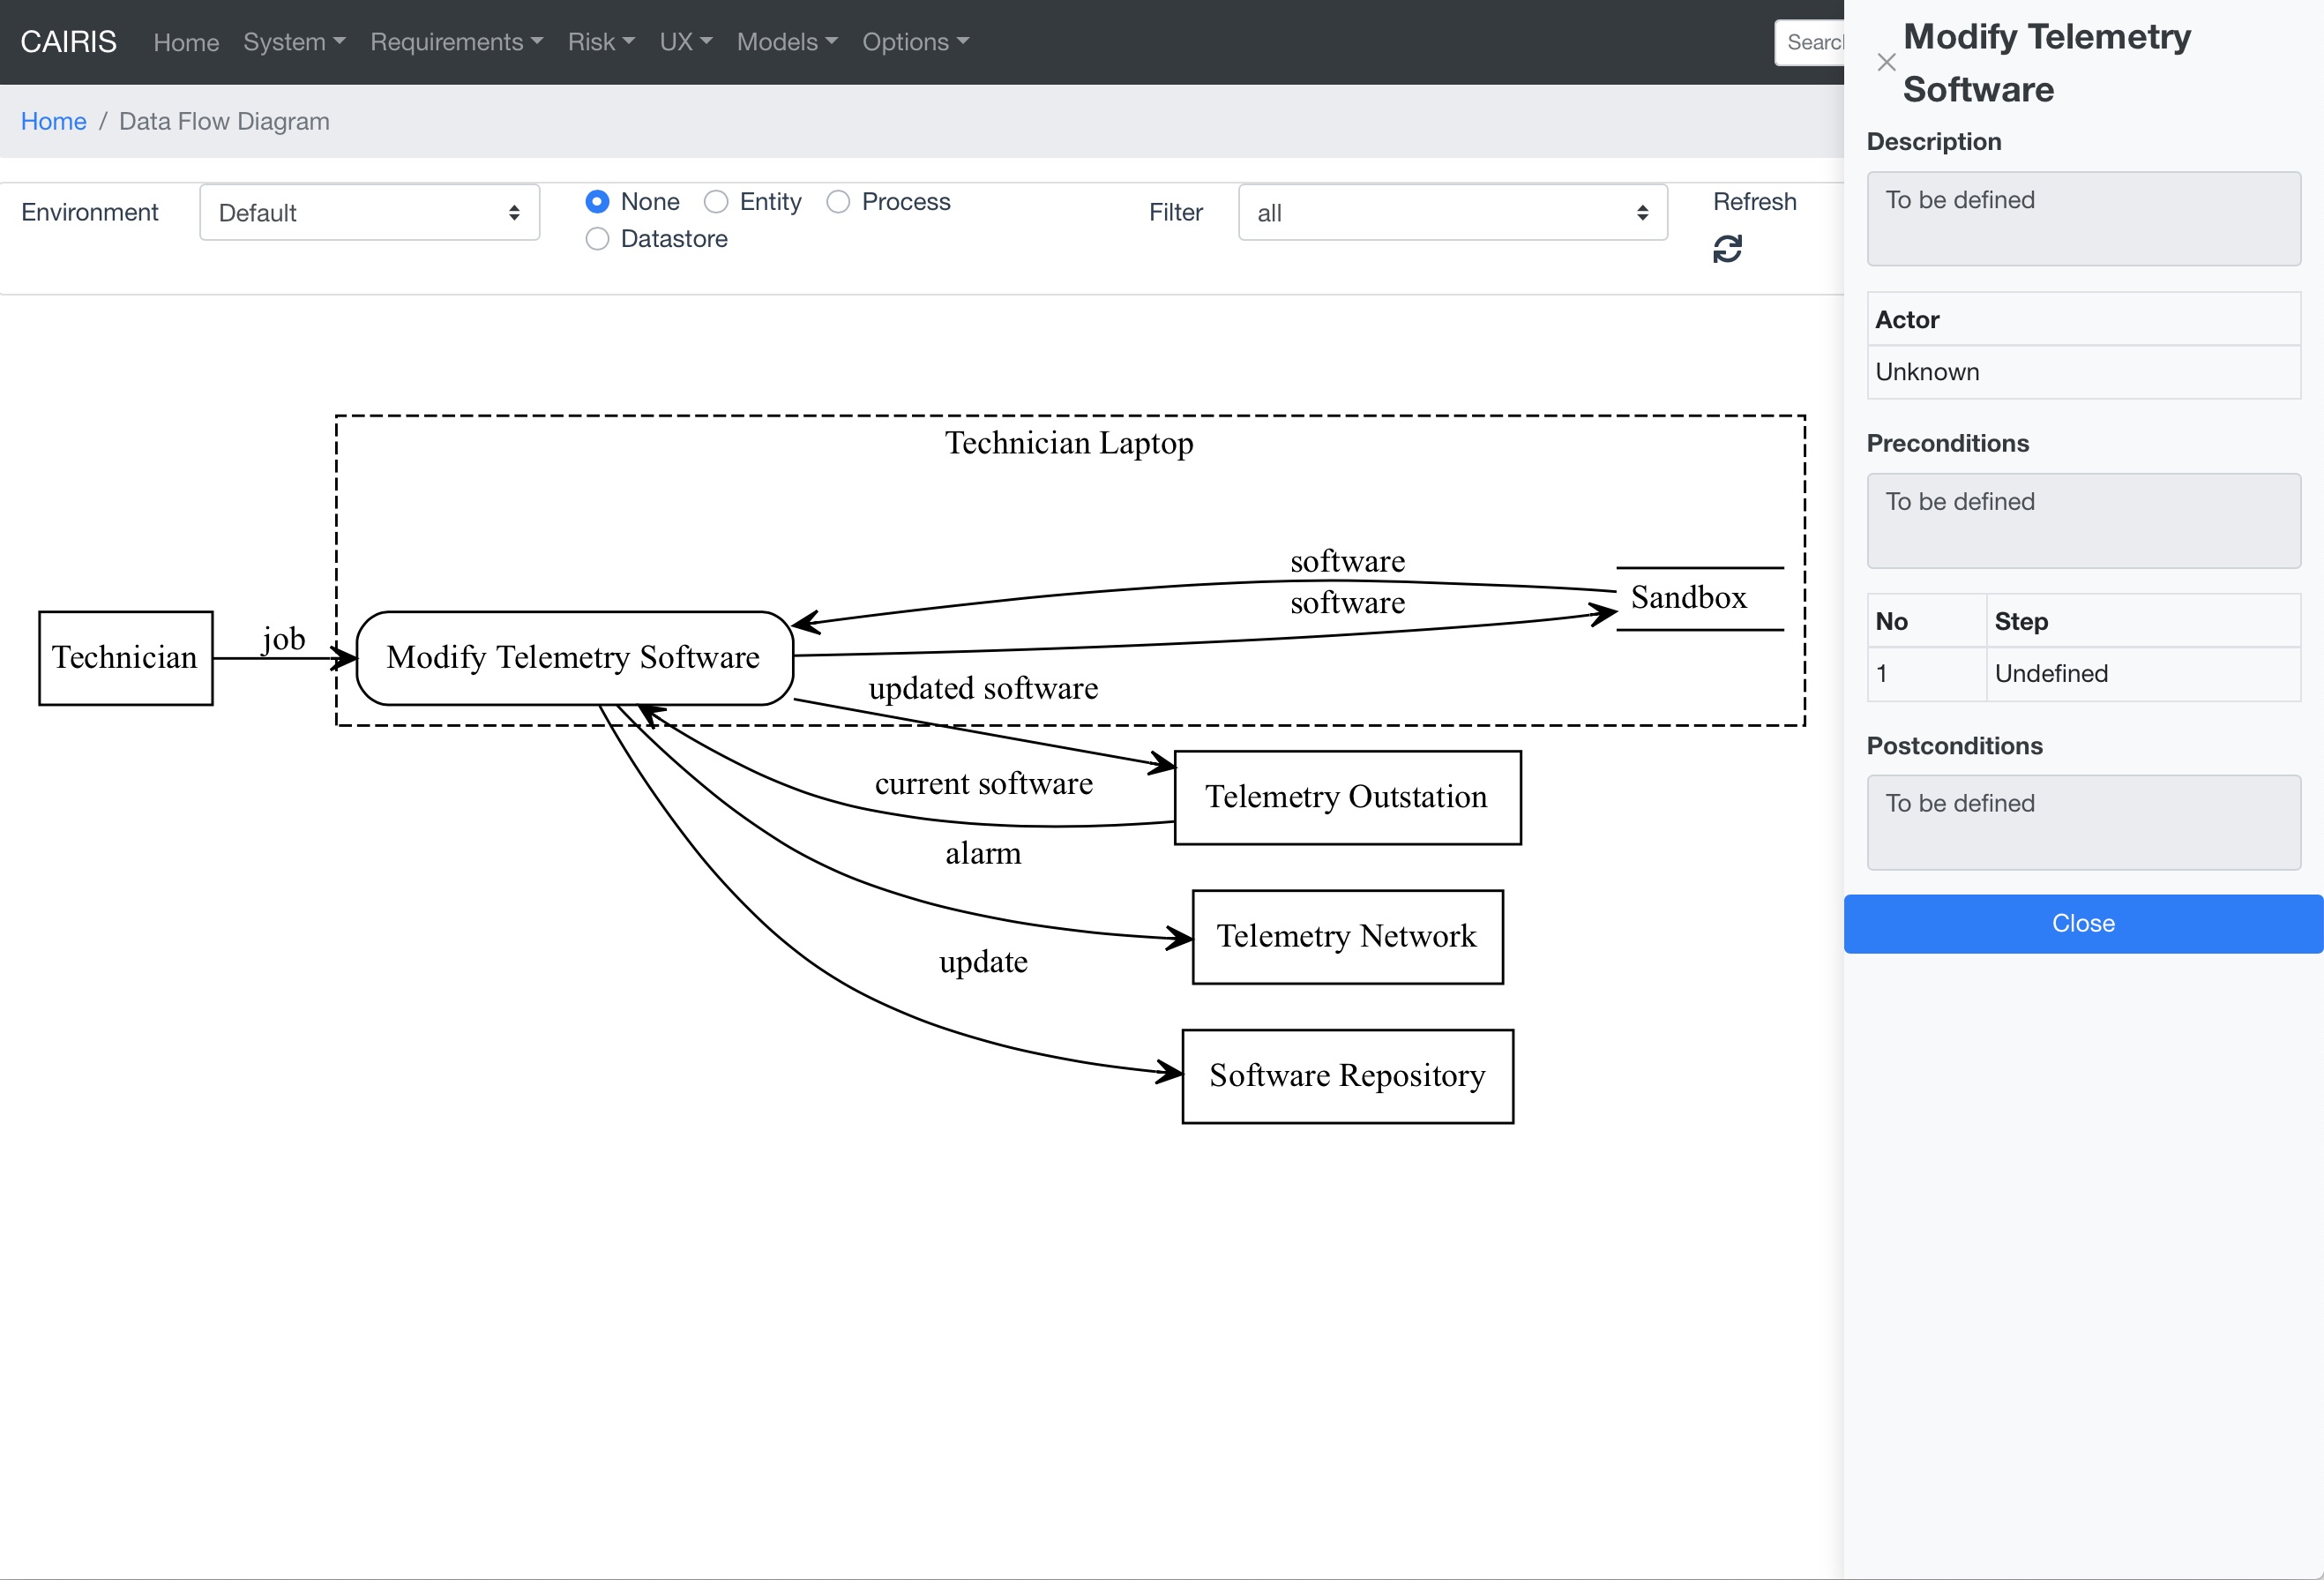
Viewing Data Flow Diagrams
DFDs can be viewed by selecting the Models/Data Flow menu, and selecting the environment to view the model for.
| alt: | DFD |
|---|
By changing the environment name in the environment combo box, the DFD for a different environment can be viewed. The model can also be filtered by DFD model element.
By clicking on a model element, information about that artifact can be viewed.
For details on how to print DFDs as SVG files, see Generating Documentation.
Modelling DFDs with diagrams.net
You can use diagrams.net to import DFDs into CAIRIS by following the steps below:
- Create a new blank diagram in diagrams.net .
- Setup the CAIRIS DFD shape library by going to the File >> Open Library from >> URL menu, and entering the URL
https://cairis.org/stencils/cairis_dfd.xml. - To add an entity, click on the square in the cairis_dfd.xml palette to place an entity on the canvas. Double click on the shape to set its label, which represents the entity name. When importing the model, if an asset corresponding with the entity does not exist, CAIRIS will create a corresponding asset with some default values.
- To add a process, click on the rounded box in the cairis_dfd.xml palette to place a process on the canvas. Double click on the shape to set its label, which represents the process name. When importing the model, if a use case corresponding with the process does not exist, CAIRIS will create a corresponding use case (and associated role) with some default values.
- To add a data store, click on the parallel lines in the cairis_dfd.xml palette to place a data store on the canvas. Double click on the shape to set its label, which represents the data store name. When importing the model, if an asset corresponding with the data store does not exist, CAIRIS will create a corresponding asset with some default values.
- To add a data flow between DFD elements, click on the arrow in the cairis_dfd.xml palette to place a data flow on the canvas. Double click on the data flow to set its label, which represents the data flow name. Right click on the data flow and select Edit Data to set the assets carried in the flow. By default, this is set to UndefinedInformation. This should be changed to represent the information assets carried by the data flow. Multiple assets should be separated by a comma. When importing the model, if assets corresponding with this comma separated list do not exist, CAIRIS will create them.
- To encompass processes and data stores in a trust boundary, click on the dashed square in the cairis_dfd.xml palete to place a trust boundary on the canvas. Right click on the shape and select Edit Data to set the trust boundary name. Once set, move the processes and data stores within the trust boundary. Please note that, as external systems, entities should not be place within trust boundaries.
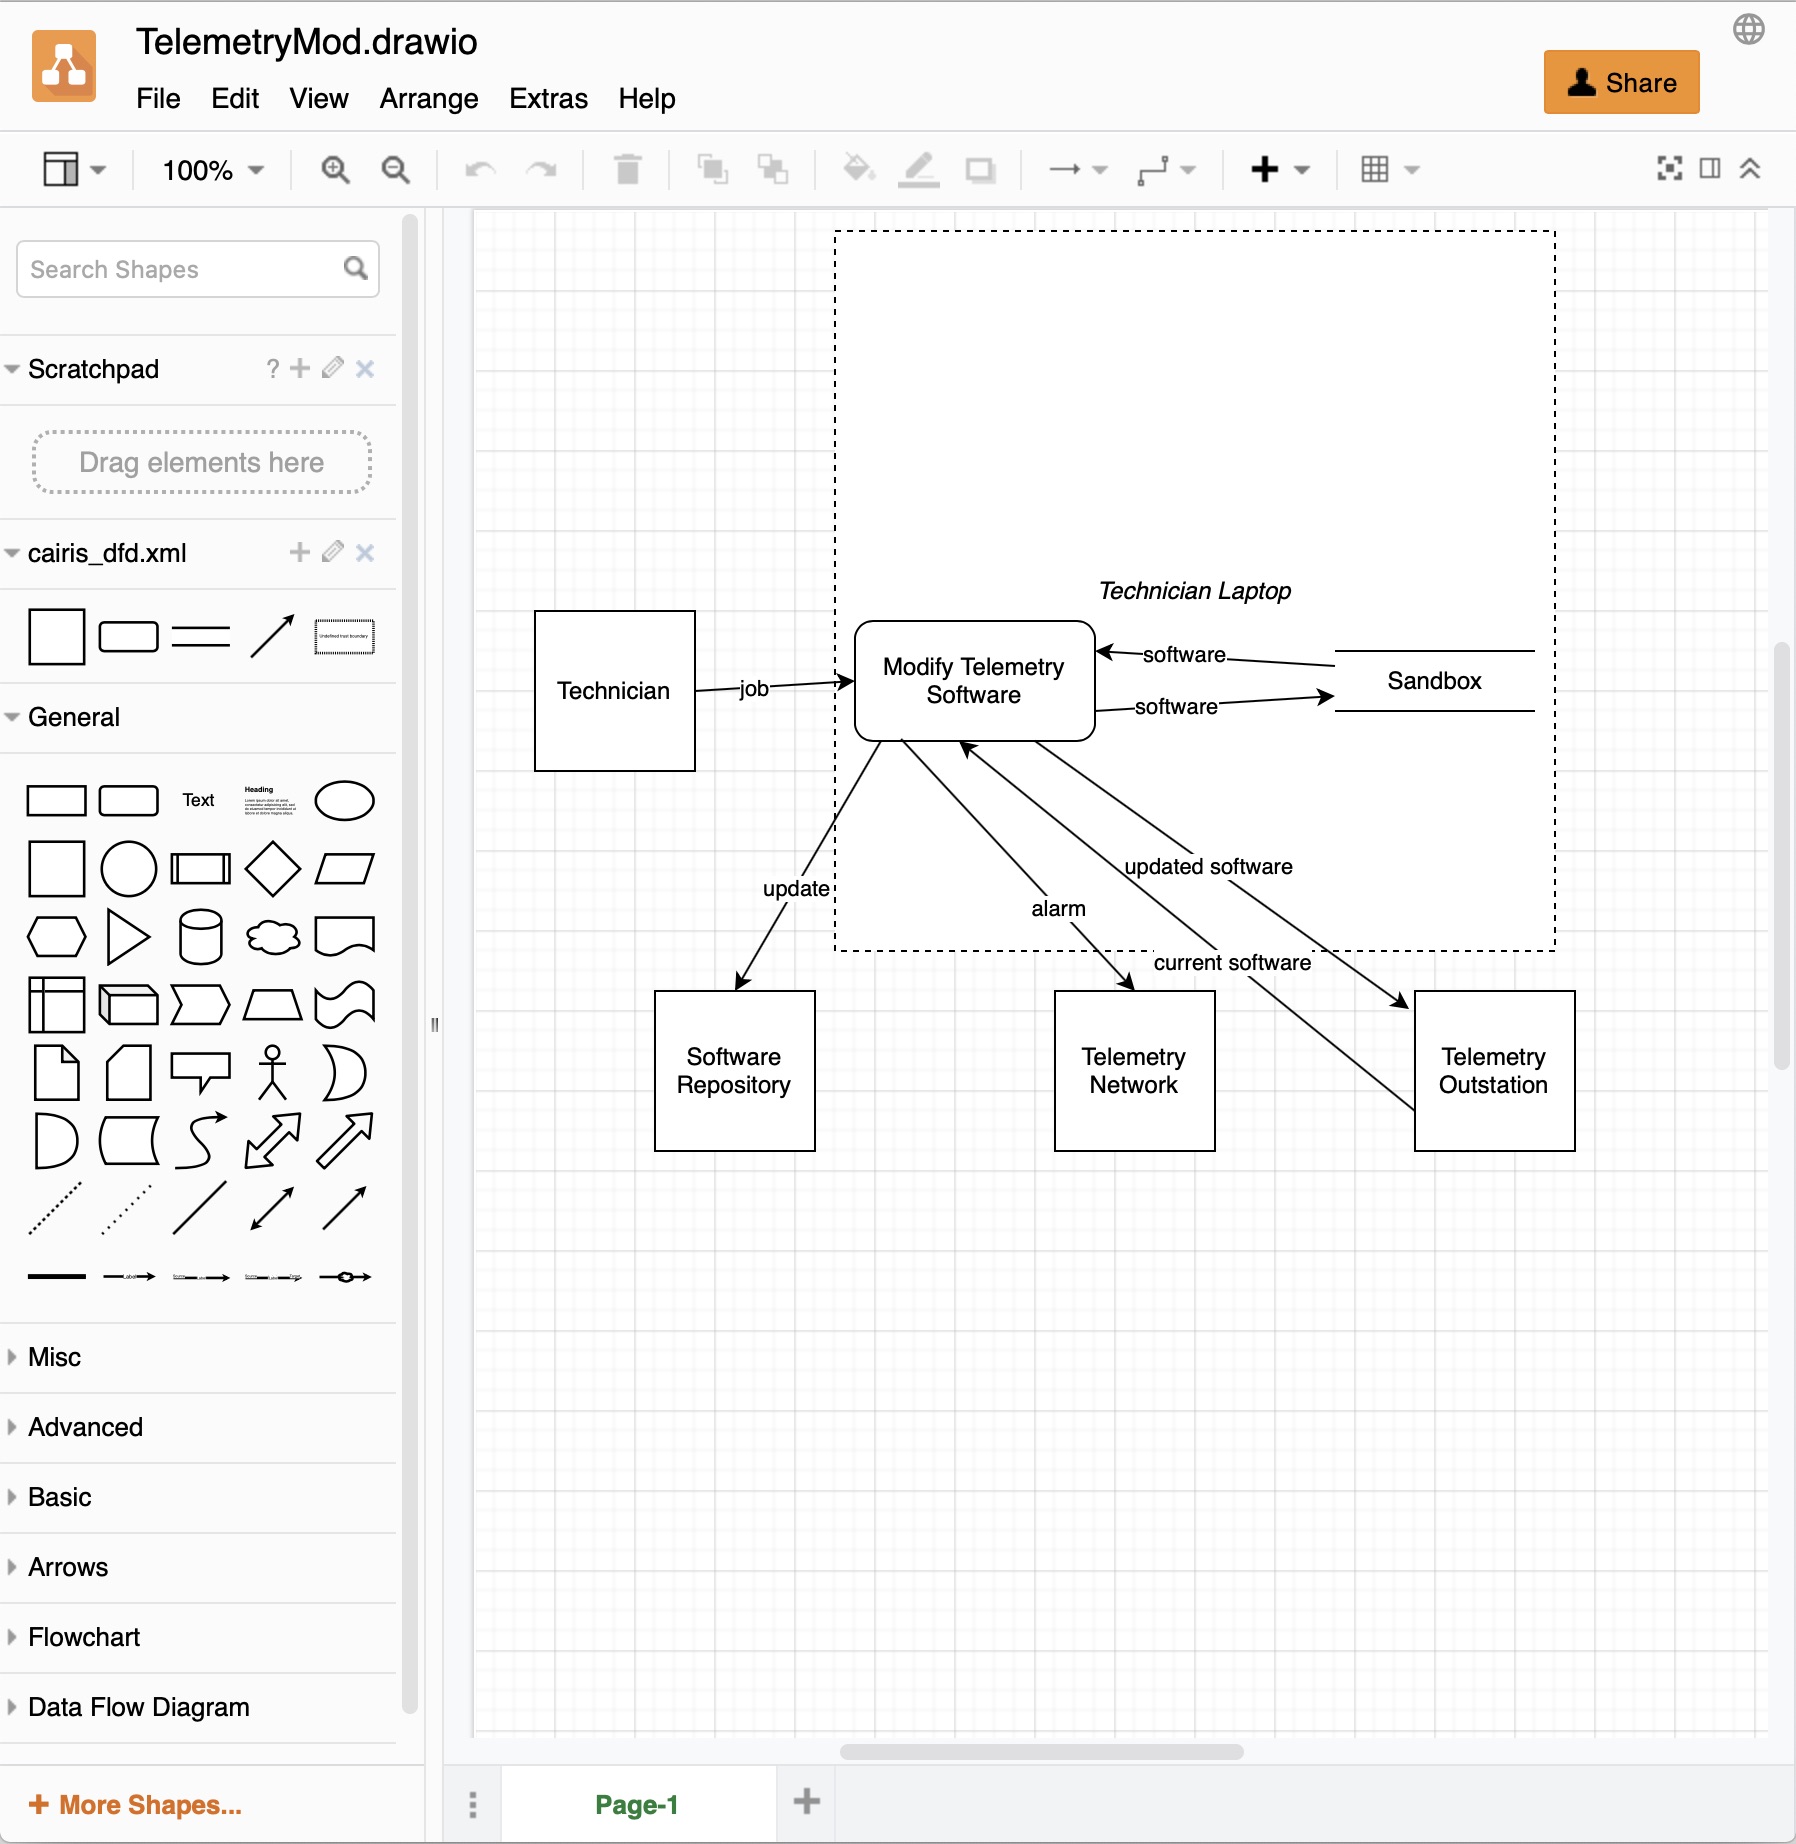
- Once the diagram is ready, select the File >> Export as >> XML… menu option, unclick the Compressed tick box, click on the Export button, and enter the name of the diagram to be exported.
- In CAIRIS, select the System >> Import menu to open the Import form. Select diagrams.net (Data Flow Diagram) from the Model combo box, click on the File button to choose the exported diagrams.net model to import, and select the environment to import the DFD into.
Note
We recommend you use the cairis_dfd.xml shape library when data flow diagramming, but you could - in theory - use any shape in diagrams.net to model DFD elements. However, you must ensure that you use the Edit Data option to add a type property to the shape, which should be set to a valid DFD type (entity, process, datastore, or trustboundary). You also need to set a name property for trust boundaries. Similarly, you also use any line to link DFD elements, but you need to use the Edit Data option to add a assets property and define at least one asset as it value.
Attack trees
Attack trees are a formal, methodical way of describing the security of systems. They are a lightweight approach for modelling attacks; this is a good thing as they are simple enough that people can quickly create and contribute to them.
CAIRIS doesn’t support attack trees, but obstacle models are represented using the same top-down approach notation as attack tree. This makes them a good candidate for representing the attacks, and the sort of things that need to hold for an attack to be successful.
Attack trees represented in Dot can be imported into CAIRIS by selecting the File/Import Model menu, selecting ‘Attack Tree (Dot)’ from the combo box, and choosing the .dot file to import. You will then be prompted for an environment to import the newly generated obstacles and obstacle associations into, together with the name of the contributor who created or imported the tree.
More details on using attack trees with CAIRIS can be found in this blog post .